

Kali Linux default GNOME Theme is very boring and plain. The reason it is like that is because Kali Linux Dev team wanted to make a fast and reliable environment so that you can boot your system quickly and ge to work. But work (or hacking?) is just part of it. Like you, I sometimes get bored looking into the same old desktop over and over again and feel like having a new desktop or change color here and there. If you have a decent enough graphics card and processor (and RAM??) you might want to change or install theme in Kali Linux (this guide applies to any Kali version, so don’t worry which version you have). As Kali uses GNOME3 (GDM) Window Manager, so we will stick with GTK3 themes. The whole process takes only a few minutes and by the end of that, you should be able to:
- Install theme in Kali Linux
- Change default theme in Kali Linux
- Most importantly, roll back your changes and get same old Desktop back.
I’m a big fan of being able to roll back my changes so that if I mess up things, at least I will know where to go back and how to roll back. This saves a lot of trouble for later usage. Some themes are poorly made and throws errors all over my terminal. In that case, rolling back and using a different theme is the best idea. At the same time, I prefer to remove that erroneous theme or clean up theme directory. I guess that’s sound good, so let’s get on with it.
Before we start, there’s two different ways you can change theme.
- Manually install theme
- Install theme via PPA repository.
I will show both because both got their own merits and the only way you learn enough is by trying every possible corners on anything.
Choice A: Manually install theme
A lot of people wants to manually install theme and there’s nothing wrong with it. Takes a few more minutes, but in this way you learn how theme works in Linux rather than just blindly typing in few commands and install themes.
Step A.1: Install gnome-tweak-tool in Kali Linux
To install themes manually, we need to install a tool called
Gnome Tweak Tool. But before you do that, please ensure you have the correct Kali Repositories added. You can follow my guide on adding official repositories in Kali Linux.
At this point I would assume you have the correct repositories added. So just type in the following command to install gnome-tweak-tool.
root@kali:~# apt-get install gnome-tweak-tool

Step A.2: Open Gnome Tweak Tool
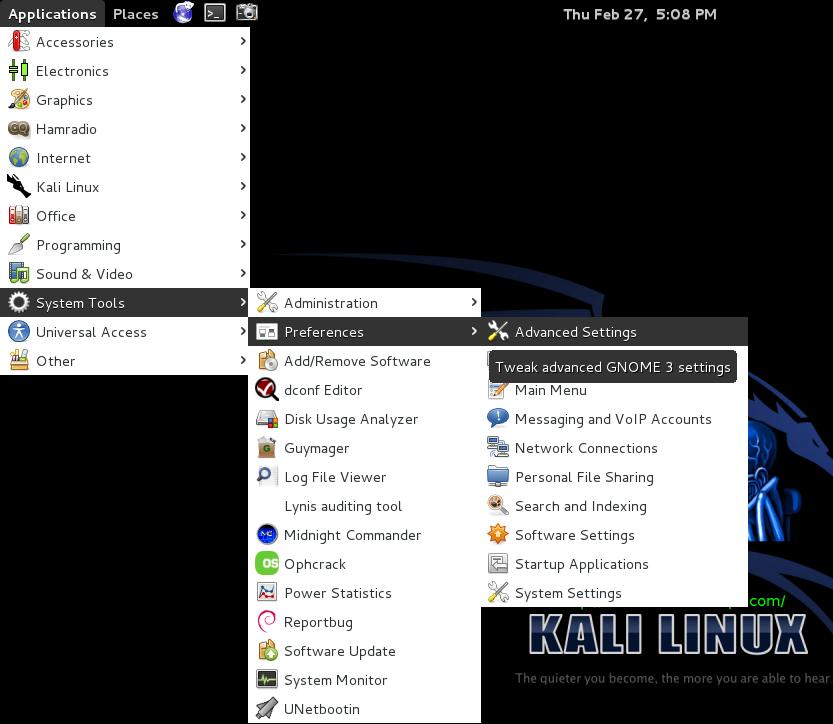
You can now go to Applications > System Tools > Preferences > Advanced Settings and select Theme TAB to inspect the current settings.
STOP: At this point I would like to take a screenshot of GNOME Tweak Tool. The reason I want it because I want to keep a copy of existing settings so that if I want, I can re-select the same settings to roll back my changes.
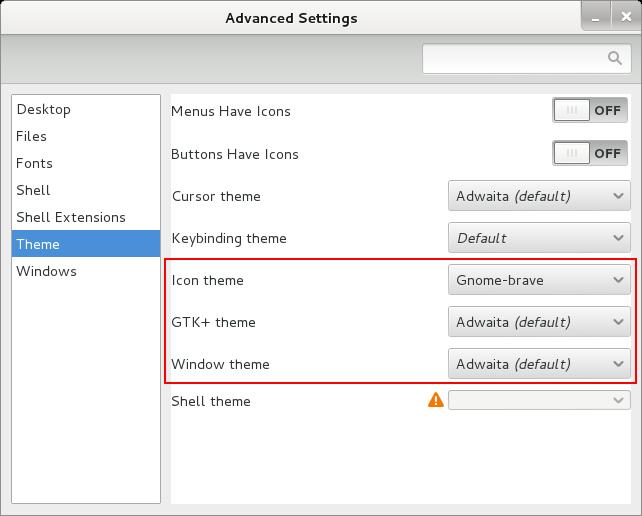
See the Tab Window Theme, Theme Icon and GTK + Theme I still use (the default) as my default settings.
Step A.3: Download theme in Kali Linux
You can go to GNOME-Look website to download themes. As we need GTK3 themes only, following is the URL you need to go:http://www.gnome-look.org
I’ve sorted the themes as Latest Updated as that will give us more recent and compatible themes in the top. Personally, I prefer minimalistic themes, but you are free to choose any as long its GTK3+ theme. You should balance themes by recent and popularity to get the best suited one (or to say more compatible one).
I’ll go with Gnome Cupertino 2.1.5 posted by trastes.
You can use your browse to download it or can download via
wget. Like always, I’ll create a folder to keep things clean in my root folder.root@kali:~# mkdir Cupertino root@kali:~# cd Cupertino/ root@kali:~/Cupertino# wget http://gnome-look.org/CONTENT/content-files/147061-Gnome-Cupertino-2.1.5.tar.gz
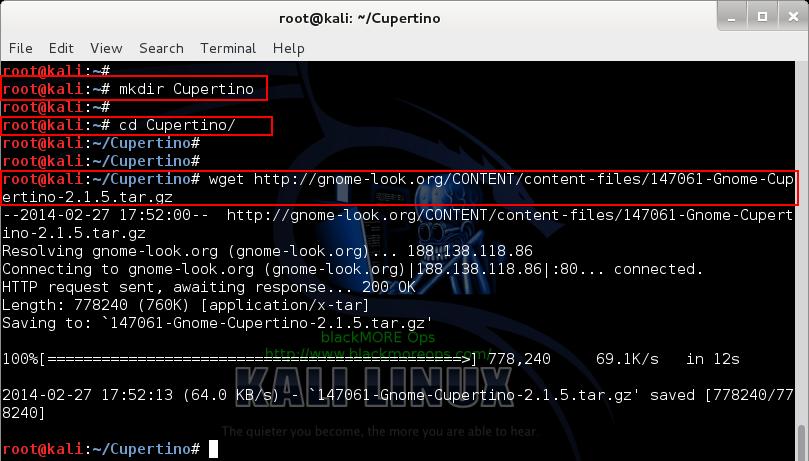
This shouldn’t take long. Most themes are small in size, Gnome-Cupertino is just few hundred K’s. …
Step A.4: Install theme in Kali Linux
Now that we have the theme downloaded,(it’s in tar.gz format) we need to uncompress it.
root@kali:~/Cupertino# tar -zxvf 147061-Gnome-Cupertino-2.1.5.tar.gz
Once uncompressed, we need to copy the extracted folders to
/usr/share/themes/ folder. Let’s do that:root@kali:~/Cupertino# cp -r Gnome-Cupertino /usr/share/themes/

This is fairly straight forward, up until now, you’ve just copy pasted files and folders.
Step A.5: Change theme in Kali Linux
Almost done. Open up
Gnome Tweak Tool again from Applications > System Tools > Preferences > Advanced Settings
and select Theme TAB.
Select the new Gnome-Cupertino theme and close
Gnome Tweak Tool window. There you go, now you have completed installing and changing theme in Kali Linux.
Step A.6: Revert back to default theme in Kali Linux
If you don’t like this new theme anymore, you can just change settings in
Gnome Tweak Tool Theme tab (See screenshot from Step A.2) and select the same settings.
Once you have reverted back, just delete the Gnome-Cupertino folder.
root@kali:~/Cupertino# rm -r /usr/share/themes/Gnome-Cupertino/
In that way, you’ve removed the unused theme and cleaned up properly.
Choice B: Install theme via PPA repository
This is more automated and you can install and remove theme via apt-get command. It got it’s perks and for many users this is a preferred option. Ubuntu or Linux Mint uses this options extensively and I don’t see why you can’t leverage this.
To change and install theme in Kali Linux via PPA repository, you need to have add-apt-repository package installed. If you haven’t got it already, please follow the guide on installing PPA repository add-apt-repository in Kali Linux. Following instructions are based on the assumption that you have add-apt-repository installed and working.
Step B.1: Install gnome-tweak-tool in Kali Linux
To install themes manually, we need to install a tool called
Gnome Tweak Tool. But before you do that, please ensure you have the correct Kali Repositories added. You can follow my guide on adding official repositories in Kali Linux.
At this point I would assume you have the correct repositories added. So just type in the following command to install gnome-tweak-tool.
root@kali:~# apt-get install gnome-tweak-tool
Step B.2: Add a PPA repository for themes
You can add PPA repository from http://www.noobslab.com/. I’ve decided on Mac OS X Lion Theme from their website.
To add PPA repository, type in the following command in your terminal:
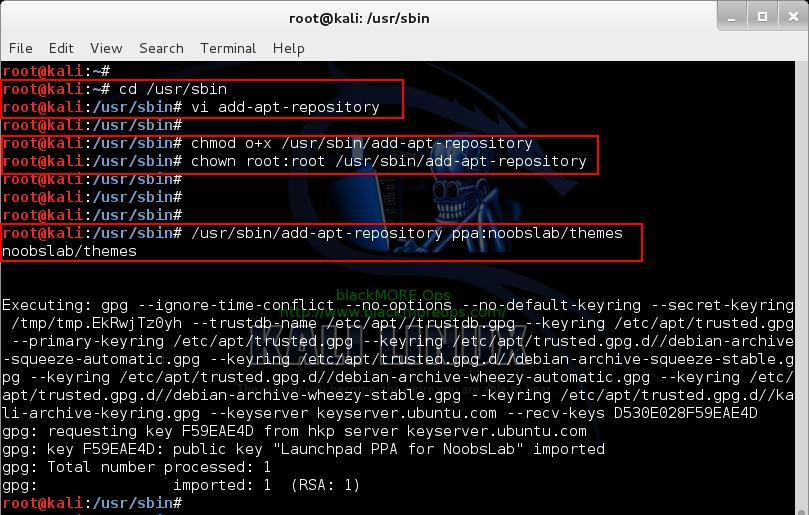
root@kali:/usr/sbin# /usr/sbin/add-apt-repository ppa:noobslab/themes
Please refer to PPA repository add-apt-repository in Kali Linux guide if you’re not sure how to.
A quick rundown of the commands are below, you need to use the code from Step 2 in PPA repository add-apt-repository in Kali Linux
A quick rundown of the commands are below, you need to use the code from Step 2 in PPA repository add-apt-repository in Kali Linux
root@kali:~# cd /usr/sbin
root@kali:/usr/sbin# vi add-apt-repository
root@kali:/usr/sbin# chmod o+x /usr/sbin/add-apt-repository
root@kali:/usr/sbin# chown root:root /usr/sbin/add-apt-repository
root@kali:/usr/sbin# /usr/sbin/add-apt-repository ppa:noobslab/themes
Once added you need to update Package Manager.
root@kali:~# apt-get update
Step B.3: Install theme from PPA Repository
Issue the following command to install Mac OS X Lion Theme in Kali Linux. .
root@kali:~# apt-get install mac-os-lion-theme-v2
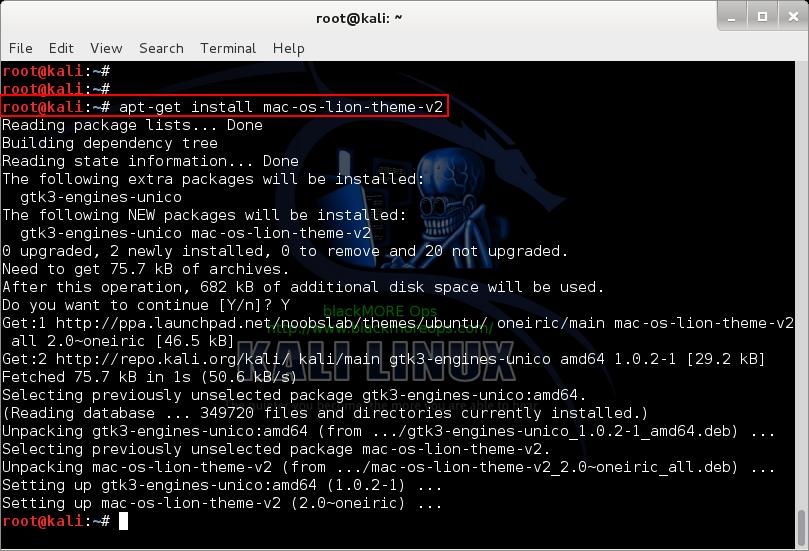
Noobslab also offers custom icons, so you can also install those if you feel like:
root@kali:~# apt-get install mac-os-lion-icons-v2
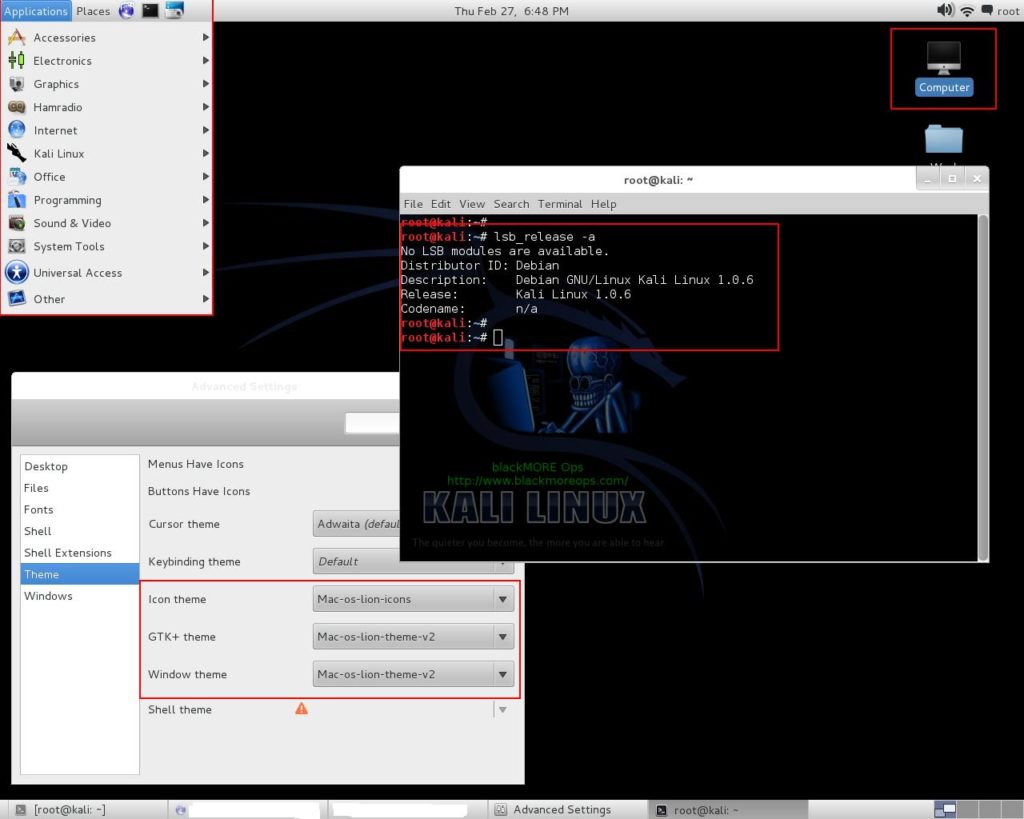
Step B.4: Change theme in Kali Linux
Open
Gnome Tweak Tool again from Applications > System Tools > Preferences > Advanced Settings and select Theme TAB.
Select Mac OS X Lion Theme and close
Gnome Tweak Tool window.
There you go, now you have Mac OS X Lion Theme and icons in Kali Linux.
Step B.5: Removing theme in Kali Linux
If you want to roll back your changes, first of all you need to select the another theme. You can just change settings in
Gnome Tweak ToolTheme tab (See screenshot from Step A.2) and select the default settings.
Once you have reverted back, just remove the theme and icons using
apt-getroot@kali:~# apt-get remove mac-os-lion-theme-v2 root@kali:~# apt-get remove mac-os-lion-icons-v2
Here’s a complete list of Theme’s and Icons that you can try to install from nooslab website via
apt-get install theme-name.
Nice and easy. You can try as many themes you want in this way.
Step B.6: More cleaning up and options to explore
Last but not the least, you should cleanup your
/etc/apt/sources.list file and remove any unused entries. I suggest to revert back to Official Kali Linux repository always.
Here’s a screenshot of my Kali Linux installation after I’ve installed MAC OSX Lion theme and icons.
Thanks for reading.


0 comments:
Post a Comment